Showing posts with label How To?. Show all posts

Friday, September 4, 2009

How To Update Firmware on SAMSUNG STAR 3G


How To Update Firmware on SAMSUNG STAR 3G

Read a entry i found on a blog ..it's quite nice if you want not to waste your time and money in finding right solution for your phones..
Hello Guys, this is my attempt to make JAVA work on this phone. I was able to do this one also successfully with help from my friend Dark Forest!! :) Thanks Mate . 

OK so now the question is how to do the FIRMWARE UPGRADE & WHY TO DO IT?? Well for starters you canINSTALL JAVA on STAR as you would do on any Nokia or Sony Ericsson phone & second BUG FIXES. Now if you haven't encountered any bug on the phone I'll mention some. The message storage is suppose to be 500, but around only 200+ messages are stored in the phone & then it says inbox full. Also when you have an incoming call or outgoing you cannot see the number to which it is going (provided you have the number stored in your phonebook) When you have multiple numbers stored under single name this is a problem, this has been fixed as you get to see along with the name of the person calling you his/her number. 4 more Russian widgets have been added (If you know Russian good :D ). 3 new games :)

Now 2 things have changed (atleast for me) The "E" indicator which used to come up on the screen on the top to indicate if the GPRS session is active, is always there & second initially when I needed to use the gesture control on the phone I used to press the lock button slightly & the screen wouldnt get unlocked but just be in standby mode & i could write the character on the screen & it would work. This has changed, now in order to achive this I have to press the call pickup/call cut or the back button on the Star 3G & regarding the E indicator, Dark Forest has confirmed it, thats nothing to worry about. It just means that GPRS Edge is available on your network, it will turn red if connected to the net. That is normal with all open market firmware. :) So problem solved. :D

Now to get on with the Firmware Upgrade (Flashing)

1st -> You have to check if you have SIM LOCK enabled on your phone.Type *#7465625# and see. SIM LOCK SHOULD BE OFF. Do not proceed if you have it ON, get it to a shop & have it disabled.

2nd -> BACKUP YOUR PHONE!!! Your contacts, messages, pictures, wallpapers, ringtones, music, gprs settings etc.. (I have provided with GPRS setting for Vodafone Mumbai below)

3rd -> You will require USB cable (The one which came with your phone) & PC Suite. Make sure PC suite is installed before you start the process as it has the drivers necessary for communicating with your phone.Make sure the phone is communicating with your PC using PC Suite.

4th -> You need to download the firmware from Dark Forest's Site as shown below.


Side by side also download Multiloader from here

5th -> Now unpack the FIRMWARE files in a folder also make sure no program in your system start-up is occupying the COM ports. PC Suite will also cause a problem, so to fix it do as shown below.


Now that you have done this, switch off your phone, remove the battery, sim & micro SD. Place the battery back inside & press the volume down button,camera button & the power button all together. the phone will power up & will have a screen as shown below. In the mean time also restart you PC (This is very IMPORTANT)


Now that you PC is restarted connect the phone to the PC using the USB cable.

Now before going on further with the actually FIRMWARE UPGRADE(FLASHING) a disclaimer.

I HAVE NOT CREATED THIS METHOD NOR DO I TAKE CREDIT FOR IT. DARK FOREST & HIS TEAM ARE THE REAL INVENTORS , I AM JUST WRITING A METHOD SPECIFICALLY MENT FOR SAMSUNG STAR 3G WITH PERMISSION FROM DARK FOREST. IF IN THIS PROCESS YOU END UP SCREWING YOUR PHONE WE ARE NOT RESPONSIBLE. ALSO BY DOING THIS YOU ARE VOIDING YOUR WARRANTY FROM SAMSUNG.


Now thats clear, lets begin.

1st -> Open up MULTILOADER & select the options in the exact order as shown below.
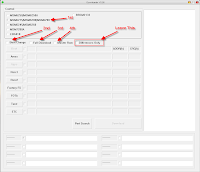
2nd -> Now after selecting the MSM6275/MSM6280/MSM6290 option, select the option as shown below.
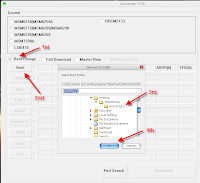

3rd -> Now that the BOOT LOADER files are in place lets proceed to FULL DOWNLOAD. Do EXACTLY as shown below.
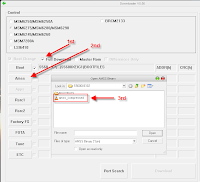

4th -> Now with Rsrc1
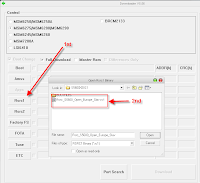

5th -> The next step is VERY IMPORTANT, choose Rsrc2 (LOW) & not (MID). MID is know to have problems while booting the phone.
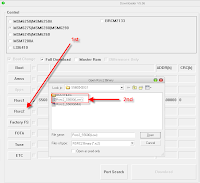

6th -> Now the Factory Setting files.
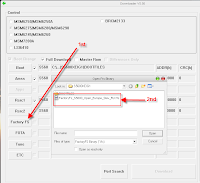

7th -> & finally the MASTER ROM.


8th -> At last the MULTILOADER should look like below, now click on the PORT SEARCH.
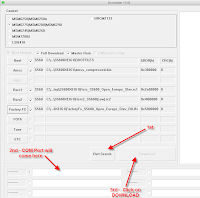


Once you have pressed PORT SEARCH, the COM PORT will come up in the filed shown, Click on DOWNLOAD.

Now sit back and wait, Multi loader will erase the rom and prepare it for rewrite in a matter of seconds. immediately after, it will begin the download process, this could take up to 20 minutes depending on you computers speed. After the process is complete, Your phone may restart on its own, this is ok. If your phones does not restart on its own, just remove the battery for a few minutes & reinstall your sim and memory card and you are ready to go! You may need to manually enter your wap and MMS settings but some providers sim will reset automatically.(I have provided with VODAFONE MUMBAI settings below)

Dark Forest's has recommend preforming a hard reset after a flash. This just makes sure every thing is cleared out and the firmware loads clean but this is not required.(In my case I had to do this)

You can perform a hard reset by typing *2767*3855# into the hand set (but not necessary.)
When the phone resets type *#1234# into your handset to check your new firmware version. :D

Thats it you are done.

Now with GPRS settings.Type as shown below.

Go to Menu -> Settings -> Network Settings -> Connections.
Create a new connection here with name Vodafone Live!
Acess Name -> portalnmms
Auth type -> Normal
User ID & password -> leave this blank.
Protocol -> HTTP
Home URL -> http://live.vodafone.in
Proxy Address -> 10.10.1.100:9401
Linger time -> 300
Don't touch the Advanced Settings option.

If you were looking for a method to update firmware on Samsung STAR (5233/S5230) visit Dark Forest's sitehere. The Firmware for 5233/s5230 can be found on his site here.
Source : Blogspot

Monday, July 6, 2009

How to Upgrade iPhone 2G/3G to Firmware OS 3.0

Step by Step Upgrade your iPhone to Firmware Os 3.0

The much anticipated iPhone OS software 3.0 has been released. The new version 3.0 of iPhone 2G (first generation), iPhone 3G and iPod Touch Firmware contains a lot of goodies and enhancements that well worth the upgrade, such as MMS support and ability to cut, copy and paste. The new iPhone 3G S (3GS) comes factory installed with OS software 3.0. Owner of previous generation of iPhone and iPhone 3G on OS 2.2 or 2.2.1 can upgrade to firmware 3.0 for free using the simple guide below.

Note: In order to upgrade iPhone Firmware version to OS 3.0, iTunes 8.2 must be installed.

  1. Connect iPhone or iPhone 3G to the computer.
  2. Run iTunes 8.2.
  3. Select the iPhone under Devices in the Source List on the left pane.
  4. In the iPhone Summary pane, click Check for Update button.
  5. Click Download and Install. Do not disconnect your iPhone until the update is completed.

Once update is finished, the iPhone or iPhone 3G will be running firmware OS software 3.0. iPhone OS 3.0 is available for free for 1st Gen iPhone and iPhone 3G users, while iPod Touch users need to pay $10 to get the upgrade, although a hack is available to let iPod Touch device upgrades free to firmware 3.0.


Source: Internet

Enable iPhone as Internet Tethering Wireless Modem Without Hack or Jailbreak

Use yOur iPhone as Wireless Modem

Apple has built Internet tethering capability to iPhone iPhone 3G and iPhone 3G S in its newest iPhone OS software 3.0. Internet tethering allows iPhone owners to use iPhone as wireless modem or dongle device to connect the PC or notebook to Internet for surfing and browsing. However, for commercial purpose, Internet tethering is disabled or blocked by default, as most mobile network carriers or operators want to charge extra fee for Internet tethering privilege, although existing service plans already allow certain limited bandwidth or even unlimited amount of data downloads.

Instead of paying excessive amount of money (most in the high 10s) in addition to the already-overpriced iPhone plan price, there was a fews hacks to enable Internet tethering on jailbroken iPhone previously. With built-in support for Internet gateway tethering in iPhone with the release of iPhone OS softwware 3.0, there is a very simple hack for iPhone OS 3.0 upgrader to enable Internet tethering, without paying anything extra or subscription fee to the mobile operator, and without jailbreak or unlock.

How to Activate and Enable Free Internet Tethering on iPhone 3.0

  1. Run Safari mobile web browser on the iPhone.
  2. Optional: If you want to generate your own mobileconfig with custom APN, username and password with Mobileconfig Generator, visithttp://help.benm.at/help.php.

    Enable Internet Tethering on iPhone 3.0

    In most case, just visit the next link directly, as the configuration files for most mobile carriers around the world have been prepared. If you’re following this link, click on Mobileconfigs.

    Turn On Interet Tethering Hack on iPhone OS 3.0

  3. Visit the following Mobileconfigs website:

    http://help.benm.at/tethering.php

  4. Select your country.

    Activate Internet Tethering on iPhone 3G S 3.0

  5. Select your mobile service provider.

    Activate and Enable Internet Tethering on iPhone version 3.0

  6. Tap Install to install new profile.

    Enable iPhone v3 Internet Tethering

  7. Select Install Now to download and install new profile.

    Enable iPhone v 3.0 Internet Tethering

  8. On iPhone interface, go to Settings -> General -> Network -> Internet Tethering.

    Internet Tethering Option on iPhone

  9. Set Internet Tethering to On.

    Activate and Enable Internet Tethering on iPhone

  10. If prompted that Bluetooth is off, select Turn on Bluetooth or USB Onlyaccording to your preference.

    Tether iPhone on USB or Bluetooth

  11. Internet tethering is enabled, connect iPhone to PC computer via USB or Bluetooth to start connecting to Internet though iPhone as tethered Internet gateway modem, with typical mobile broadband connection speed , normally up to around 1.4 Mbps. Meanwhile, iPhone will glow blue too.

    iPhone on Internet Tethering Enabled

    Note: Tethering computer through USB to iPhone to access Internet is much easier. Normally, Windows or Mac system will automatically recognize the tethered iPhone, and create require network connection to take advantage of the shared Internet access via iPhone. For Bluetooth connection, other than usual pairing, user also has to select “Connect to Network” from the Bluetooth device option in order to access the Internet from desktop or notebook/laptop computer via tethered iPhone.

Actually, the hack can be performed manually by iPhone owner himself or herself. The profile download link above provides easiest and most convenient way to activate and enable Internet Tethering without hassle though. BenM.at is gathering all these publicly available information such as APN (access point name) and password for the iPhone for many network across the world, and create a XML based profile by using Apple’s iPhone Configuration Utility. The hosted iPhone tethering configuration profiles is pushed to the handsets of iPhone users who download the profile, and instant activates the tethering system free of charge.

After downloading and installing the new Internet tethering enabled profile, some users may report MMS and/or VVM (Visual Voicemail) problem, where MMS or Visual Voicemail stops working. To fix the MMS and VVM not working after enabling Internet tethering error, go to Settings -> General -> Reset ->Reset Network Settings. After the short reset, iPhone should be able to be used for MMS, Voicemail and Internet tethering.


Source: Internet

Upgrade your iPod to Firmware 3.0 for FREE

Free Upgrade your iPod Touch to Firmware OS 3.0

Apple has release iPhone and iPod Touch firmware OS software version 3.0. The firmware 3.0 is a major update that adds tons of new features to the portable device. While all generations of original iPhone and iPhone 3G entitles tofree upgrade to iPhone OS 3.0 software update, both 1st generation and 2nd generation iPod Touch 2G is required to pay $9.95 to upgrade to to OS 3.0.

Bypass and skip the payment to Apple. It’s obviously unfair practice by Apple towards iPod Touch, who properly do not incur recurring charges. Use the following guide on how to upgrade and update to iPod Touch OS 3.0 software update firmware for free without cost.

How to Upgrade or Update iPod Touch to OS 3.0 Firmware For Free

  1. Download and install iTunes 8.2 or higher version.
  2. Download iPod Touch 2G OS firmware 3.0 Apple Device Software Update IPSW file, iPod2,1_3.0_7A341_Restore.ipsw or iPod Touch 1G OS firmware 3.0 Apple Device Software Update IPSW file,iPod1,1_3.0_7A341_Restore.ipsw via the iPhone OS 3.0 software update direct download links.

    Note: If the downloaded file is in ZIP format (iPod2,1_3.0_7A341_Restore.zip) , then rename the extension from .zip to .ipsw. If the file name is been appended with .zip extension, such as iPod2,1_3.0_7A341_Restore.ipsw.zip, just remove the .zip off the filename.

    If you encounter “an error occurred while processing your request” error message when attempting to download iPod Touch firmware, download the IPSW files from here (for 1st generation iPod Touch) or here (for 2nd generation iPod Touch).

  3. Plug in and connect the iPod Touch to computer.
  4. Run iTunes 8.2 or higher.
  5. Select the iPod Touch from Devices list.
  6. Optional but recommended, take a backup of the iPod in case of accidental file lost.
  7. Now there are two ways to update iPod Touch. For user who want to clean and fresh upgrade the iPod Touch, without retaining any existing songs, musics, videos, movies, apps and other media or data files on iPod Touch (mean you will be losing all files stored on iPod Touch), follows these steps:
    1. In Windows Environment, press and hold Shift key and left clickRestore.

      In MAC OS system, press and hold Option key and left clickRestore.

    For user who want to retain and save everything that has been uploaded and stored on iPod Touch or ensure that the media is untouched (not losing any files), follow these steps instead:

    1. On the iTunes main screen, there should be 2 options: “Check for update” and “Restore”. Click on Check for update.
    2. A web page showing the iPod Touch OS firmware 3.0 features and offering option to buy for $9.99 will be loaded and shown. Click onCancel.
    3. iTunes will return to the previous iPod Touch main page. However, the “Check for update” option has now been change to “Update.
    4. In Windows environment, press and hold Shift key and left clickUpdate.

      In Mac OS X system, press and hold Option key and left clickUpdate.

  8. Locate and select iPod Touch OS 3.0 Apple Device Software Update IPSW file downloaded in step above.
  9. The update process will start. iPod may reboot a few times. Do not disconnect iPod Touch until iTunes has completed updating iPod Touch.
  10. Once upgrading is done, the iPod Touch will be on OS firmware 3.0, for free without any cent been paid.
  11. Optionally, if you have choose to restore iPod Tunes to firmware OS software 3.0 at factory default, iTunes will offer option to either create a new iPod or restore it from backup. For user already created a backup of iPod, just restore the date files to upgraded iPod Touch.

Note: If there is an error when iTunes attempts to recognize iPod Touch, just unplug and plug the iPod back in again.


Source: Internet

SnagIt 7.2.5 Full Version Free Download

Genuine Software Key Code to Download SnagIt 7.2.5 Free

SnagIt(or Snag It) from TechSmith is one of the popular screen capture software that allows user to capture anything and everything on the screen, edit and combine those captures, share the images via favorite applications, and organize and find captured images again later.

TechSmith has released SnagIt version 9.1, which is the latest version available. As a result, TechSmith has used older SnagIt version 7.2.5 as a promotional tool to entice users to SnagIt brand of screen capture Software. There used to be free SnagIt 7 serial license key giveaway, which has expired. User who doesn’t manage to grab a free product key for SnagIt 7 can use the following trick to get the free license of the popular shareware.

  1. Visit the following Avanquest Advent Calendar 2008 offer page:

    http://web.avanquest.com/special_offers/2008_calendar/calendar.cfm

  2. Click on date numbered 13.
  3. Click on Télécharger gratuitement button.
  4. Enter email address (adresse email), first name (prénom), and last name (nom).
  5. Click Continuer when done.
  6. A serial key of SnagIt 7 will be displayed on the screen.
  7. Download SnagIt 7.2.5 setup installer: snagit.exe.
  8. Install SnagIt 7.
  9. Run SnagIt 7, go to Help -> Enter Software Key, and enter the SnagIt 7 serial number to unlock and activate full version of SnagIt 7.
  10. Although SnagIt 7 is older version of SnagIt, but it has all the necessary functionalities for screen capturing for everyday use. The version 7 of SnagIt should suffice for most users without buying newer version of SnagIt 9.


    Source: Internet

Ultrasn0w Free Download to Unlock iPhone 3G and 3GS with Firmware OS 3.0 (Baseband 04.26.08)

Download Free Ultrasn0w to Unlock iPhone 3GS and iPod 3G


Ultrasn0w is a software-based unlocking tool to crack and unlock any version of the iPhone, including original 1st generation iPhone, iPhone 2G or iPhone 3Gs (3G S), which running on firmware software OS version 3.0 with baseband 04.26.08. Unlocking allows iPhone to be used to any mobile service provider or operator, instead of tying to particular mobile carrier, such as AT&T in USA and O2 in UK.

Previously, original and 3G iPhones are unlocked by using Yellowsn0w tool, which unlocks iPhone on firmware OS 2.2. Ultrasn0w effectively replaces Yellowsn0w as previous bug used to inject payload code in iPhone firmware 2.2 was closed by Apple in firmware OS 3.0. Ultrasn0w is born after any loophole to inject code for unlocking iPhone is found by an iPhone user accidentally. Ultrasn0w claims to work with any version of the iPhone, including the new iPhone 3G S, as of version 0.6, as shown in iPhone 3GS unlocking demo video.

In order to unlock iPhone 3G running on firmware 3.0, the iPhone with firmware OS 3.0 must first be jailbroken with Redsn0w in Windows or Mac OS X system, or PwnageTool in Mac OS X, which will also install Cydia/Icy, where Ultrasn0w is available in its repository exclusively. iPhone 3G(S) requires Purplera1n to jailbreak.

Guide to Install Ultrasn0w and Unlock iPhone 3G with OS 3.0 and 04.26.08 Baseband

  1. Ensure you have upgraded to iPhone OS 3.0.
  2. Jailbreak your iPhone 3G using redsn0w or PwnageTool (this will also install Cydia/Icy).

    Jailbreak iPhone 3GS with Purplera1n.

  3. Run Cydia or Icy.
  4. Please add the repo repo666.ultrasn0w.com to Cydia or Icy. That last “o” is actually the number zero “0”! If you use the letter “o” you’ll get an error.
  5. Search for ‘ultrasn0w’ in cydia or icy and install ultrasn0w.
  6. Reboot your iPhone 3G or 3GS.
  7. T-Mobile USA users should disable 3G before using ultrasn0w. To disable 3G Mode in iPhone 3G, go to Settings -> General-> Network and turn off 3G Mode.

Here’s a demo video by iPhone Dev Team that unlocked an iPhone 3G with Ultrasnow prior to its release.


Note: You will responsible for any damage done to your iPhone during jailbreaking iPhone 3Gs and Unlocking it. Neither will your iPhone warranty will be valid nor anyone else could be held responsible if something goes wrong. sO i strongly suggest not to try it if you don't have sufficient knowledge about it and unsure to use the tools described in the tutorial..!!


Source: Internet

Download Purplera1n for Mac to Jailbreak iPhone 3GS

Jailbreak iPhone 3GS with Purplera1 for MAC

urplera1n, the jailbreak solution for iPhone 3GS (3G S), has been released for Mac OS X platform. Geohot has managed to release Purplera1n for Windows operating system, which has since been updated to version RC2. AriX and westbaer has since been working on Mac version of Purplera1n, and released the Purplera1n for Mac OS X.


The availability of Purplera1n for Mac OS X isannounced by Arix and westbaer, and can be downloaded from the same domain atpurplera1n.com. Together with ultrasn0w, iPhone 3Gs can now be jailbroke and unlocked.

The guide to use Purplera1n is very easy, just unzip the content to a folder, and double click on the purplerain icon to run the application. Press the Make It Rain! button to start the jailbreaking process, and then follow on-screen instructions.

Direct Download Links to Purplera1n for Mac OS X


Source: Internet

Ultrasn0w Unlocks iPhone 3GS Video Demo

dO it stEp bY sTep nOw..Unlock iPhone 3GS with Ultrasn0w

iPhone Dev Team have published a video demonstration on using the Ultrasn0w unlocking solution tool to unlock iPhone 3GS (3G S). iPhone Dev Team claims Ultrasn0w uses the at+xlog crash as an injection vector of our unlocking payload, and it does so on the iPhone 3GS in exactly the same way as on the iPhone 3G. Together with 24Kpwn exploit found in iPhone 3GS bootrom, ultrasn0w will be able to be used on the iPhone 3GS for unlockers, without any modifications whatsoever.


NOTE: DO NOT UPGRADE TO 3.1 YET IF YOU WANT THIS UNLOCK.

A brief demonstration of the iPhone Dev Team’s unlock for the new iPhone 3G S.

Before using ultrasnow to unlock iPhone 3GS, it’s recommended to backup the personalize 3.0 firmware bundle.

A warning though is that ultrasn0w injection vector will be lost if user update to upcoming iPhone OS Software 3.1 using the official Apple IPSW, which also updates the baseband. Until a tool is released that allows user to update the firmware without updating the baseband, any upgrade to firmware OS 3.1 will break the unlock.


Source: Internet

How to Use Purplera1n to Jailbreak iPhone 3GS (3G S)


JailBreak & Unlock iPhone 3GS
Purplera1n, the jailbreaking tool for iPhone3GS (3G S) has been released by George Hotz. By usingpurplera1n to jailbreak iPhone 3GS, user can install unofficial or unauthorized applications which do not make it to Apple App Store in iPhone 3GS. And Ultrasn0w can be installed to unlock iPhone 3GS. Purplera1n uses iBoot Environmental Variable Overflow bug that presents in iPhone 3GS bootrom to inject code to jailbreak iPhone 3GS.

Here’s the brief guide on how to use Purplera1n to jailbreak iPhone 3GS on firmware OS 3.0. Important note is that Purplera1n is meant for iPhone 3GS only, and is not an unlock tool to break the SIM-lock.

How to Jailbreak iPhone 3GS on Firmware 3.0 with Purplera1n

  1. Download latest version of Purplera1n from http://www.purplera1n.com/ (Purplera1n for Windows or Purplera1n for Mac).
  2. Download and install iTunes 8.2.
  3. Connect iPhone 3GS 3.0 to computer.
  4. Backup all contents on iPhone 3GS.
  5. Double click on purplera1n.exe to start running Purplera1n.
  6. Click on make it ra1n button.
  7. Wait for iPhone 3GS to enter recovery mode. And then Purplera1n will reboot the iPhone 3GS device.
  8. After iPhone 3GS bootup, there is a app called Freeze which is the Purplera1n installer app on the Springboard. Click on Freeze to run it.
  9. In Freeze screen, click on Install Cydia.
  10. Cydia will be downloaded and installed. The status will change to “Finished” once the whole jailbreak process is finished.
  11. If the Cydia does not show up after Freeze is completed, reboot the iPhone.
  12. Launch Cydia and let it run all the necessary updates.
Currently, Purplera1n is only available for Windows System. Some apps such as WinterBoard and VOiPOver3G still does not work properly on iPhone 3GS, so if you’re looking to install these apps, it’s possible to wait for the update been released before jail breaking the iPhone 3GS.


Note:
You will responsible for any damage done to your iPhone during jailbreaking iPhone 3Gs and Unlocking it. Neither will your iPhone warranty will be valid nor anyone else could be held responsible if something goes wrong. sO i strongly suggest not to try it if you don't have sufficient knowledge about it and unsure to use the tools described in the tutorial..!!

Saturday, March 28, 2009

How To Fix Nokia 5800 Expired Certificate Error During SIS Installation?

Got irrtated with "Expired Certificate" on Nokia 5800 XpressMusic? Fix it..!

It's quite annoying “expired certificate” problem that happen when few attempt to install SIS/SISX program files in Nokia 5800 XpressMusic.The Google result suggests me to reset the date of phone to be earlier or later than current date,format the phone with *#7370# secret key followed by changing the phone regional settings to other countries (UK, HK, etc), set “Online Certificate Check” to off, etc.
There are forums and blogs mentioned that the version 10 firmware is well known for this “expired certificate” bug and thus should upgrade to the latest firmware version 11.0.008. However that doesn't solve the problem either..!!

How to Fix "Expired Certificate" on Nokia 5800 XpressMusic :
Step By Step..

Backup all messages, notes, calendar entries, and contacts.

I used Nokia PC Suite to backup all these four components instead of using Nokia 5800 inbuilt backup function, which doesn’t has an option to backup Notes (but I’m not sure the ALL settings will back up the Notes).

Remove the microSD memory card.

When the phone is powered on, don’t simply remove the memory card. Otherwise, the memory card content will likely corrupt.

To remove the microSD card when the Nokia 5800 is switched on, press the power key (the button next to the power charging port), scroll down to locate and select Remove Memory Card, opt “Yes” as the “Removing memory card will close all open applications. Remove anyway?” message is displayed.

Shortly after, the “Remove Memory Card and press OK” message appears, and then the microSD is ready to be unplugged or removed from the dedicated slot.

Notes, both SIM card and microSD card slot are next to each other on the same side (another defect, personally), don’t be careless and end up corrupting the SIM card (if you happen remove SIM card instead of microSD card).

Format the Nokia 5800

Access to touch keypad and enter *#7370# secret code (not so secret, anyway) to restore phone settings to factory default (even the user data and files are deleted).

Next, you’re prompted to enter the Nokia phone lock code. The default is 12345, if this code hasn’t been changed by yourself or any one.

Then, the phone restarts and you’ve to select the country region (just select your own country from the list, in this case), followed by request to enter current date and time.

When the phone is ready, power it off again to re-insert the memory card (for highly safety measure, unless there are nothing important kept in the memory card, e.g. picture, music, documents, etc).

As the phone is switched on again with memory card inserted, the “preparing memory card” message appears.


Source: Internet

Sunday, March 22, 2009

Download & Save Google Book as PDF with Google Book Downloader

Now save all your favourite books from Google Book Search..!!!
Google Book Search a unique place to search and read your favorite books before actually purchasing or to take reference from that book for your documents. Google Book search lets you to download non copy write and public domain books and documents in PDF format.
But you can’t download copy write Books from Google Book Search. A several restrictions are enforced for preventing downloading of copy write books, at max you can read some pages from that book. Here is small utility Google Book Downloader 0.1.0 for downloading and saving of books as PDF format from Google Book search.

Screenshot of Google Book Downloader 0.1.0
Google Book Downloader 0.1.0 can only download books which are marked as to full view. If you try to download copy write book then it not download all pages of book.
Download Link: Download Google Book Downloader 0.1.0 Alpha 2.
Source: Internet

Saturday, March 21, 2009

Fix Desktop.ini Opening on Every Reboot on Windows 7 Build 7057

Fix Desktop.ini Bug on win7 7057
Windows 7 Build 7057 x86 is leaked & available for download on popular torrent websites and I suppose many of you have already downloaded & Installed Windows 7 build 7057.
Windows 7 Build 7057 has many new changes as well as bug fixes like Windows 7 Beta UAC bug. These changes include a set of new wallpapers, Revamped Logon and shutdown screen, changes in user pictures.
Users who has installed Windows 7 Build 7057 are reporting a startup bug where Desktop.ini Opens in Notepad on Every Boot. Fortunately the fix for this Windows 7 desktop.ini startup bug is very easy. Check out below instructions on how to fix Windows 7 Build 7057 desktop.ini bug.

Fix Windows 7 Build 7057 Desktop.ini Startup Bug


Method :1
1. Navigate to C:\ProgramData\Microsoft\Windows\Start Menu\Programs\Startup
2. Delete desktop.ini
3. Navigate to C:\Users\USERNAME\AppData\Roaming\Microsoft\Windows\Start Menu\Programs\Startup
4. Delete desktop.ini if present.
Thanks to chris123nt for providing this fix.

Method : 2
1. Under Folder Options -> View , select “Show hidden files, folders and drives” and un-check “Hide protected operating system files” so that you can see the hidden desktop.ini files.
2. Open the start orb and at the search type: shell:startup and press Enter. The start menu startup folder will open, where you will find a desktop.ini file. Delete it.
3. Open the start orb and at the search type: shell:common startup and press Enter. The “all users” start menu startup folder will open, where you will find a desktop.ini file. Delete it too.
4. Done. Reboot and the desktop.ini will not appear again.
Above fix is provided by one of sevenforums.com member.
Source: Internet

Download Logon UI Background Changer for Windows 7

Now Windows 7 officially support Logon UI Backgroung Customisations..!
One of interesting finding in Leaked Windows 7 Build 7057 is ability to change Windows 7 Logon background images without need of any third party tools. Now you can have custom logon background for your Windows 7.
However the manual process of changing background wallpaper of windows 7 is not easy and requires you edit registry and place image files in system folder. Here is an small utility Logon Changer for Windows 7 developed by Steve Sinchak one of member of Winvistaclub.
Logon Changer for Windows 7 provides an easy way to customize the logon screen background with just a few clicks. Simply download the free application, run it and click Change Logon Screen.
The application will prompt for the location of the new background image and then install the new screen behind the scenes. Tweaks.com Logon Changer will even provide a preview of your new background on a logon screen.
You can also Test your Custom background before actually changing Windows 7 Logon background.
If you wish to revert back to default Logon background then simply click on Revert to Default of Logon Screen.


Download Link: Download Logon Changer Windows 7 to change logon background wallpaper.


Source: Internet & Withinwindows

Find High Clicks Area (Heatmap) of Your Blog with WordPress Heatmap Plugin

Get high Click areas on your blog..!!

Normally on every blog and website there is certain area like above fold, near left side, top area, where users mostly clicks or just hover their mouse referred as website heatmap. This heatmap helps you to find places where your blog & Website receives maximum clicks and user attention.
Now by using this heatmap you can optimize your blog to show Adsense ads, banners or place navigation links in those areas and increase likelihood of conversion and earnings. Here is free wordpress plugin, Heatmap plugin to generate heatmap for your wordpress.
WordPress Heatmap Plugin Generates png image showing hot and cold click zones to represent user clicks.


Screenshot of WordPress Heatmap Plugin


In order to use WordPress Heatmap plugin you need to have graphic library GD2 (PNG support needed) on your server and it can only track clicks from user browser’s with JavaScript.

Download Link: Download WordPress Heatmap Plugin and Find high Click Thru Area of your blog.


Source: Internet

How to Jailbreak iPhone 3G or iPod Touch Firmware 2.2.1 with QuickPWN 2.2.5

I've posted a small guide for how to unlock iPhone 3G 2.2 with Yellowsn0w which seems to be very helpful for many users.
Now its turm to jailbreak iPhone 3G Firmware 2.2.1. iPhone dev team is really fast as it’s just a two days ago when apple had released firmware 2.2.1 for iPhone & iPod and iPhone Dev Team is ready with QuickPWN 2.2.5 and Pwnagetool 2.2.5.

We have all stuff which is necessary for iPhone 3G 2.2.1 jailbreak so let’s start with iPhone firmware 2.2.1 jailbreak process using QuickPWN 2.2.5. Here is small guide for that.You can use this guide to jailbreak your iPod Touch, iPhone 2G, and iPhone 3G where as iPod Touch 2G users need to wait for Redsn0w.

Please Note: iPhone 3G user planning to Unlock iPhone 3G 2.2.1 do not follow this guide you need to use PwnageTool 2.2.5 to Jailbrek iPhone 3G 2.2.1.
You need to have latest iTunes, you can download iTunes from here.


How to Jailbreak iPhone 3G Firmware 2.2.1 with QuickPWN 2.2.5
1. Download iPhone/ iPod Firmware 2.2.1 and save it on your computer (Preferably create a folder QuickPWN and save in that folder this is for simplicity)
2. Download QuickPWN 2.2.5 latest iPhone firmware 2.2.1 jailbreak tool.
3. Unzip QuickPWN 2.2.5 in a folder created on 1st step.
4. Connect your iPhone/iPod touch to your commuter.
5. iTunes should detect your Devices.
6. Now you can either update iPhone/iPod touch to Firmware 2.2.1 or Restore Firmware 2.2.1. Its better to restore to have fresh & clean firmware installation.
7. Once you have finished with Restoring/Updating iPhone to Firmware 2.2.1 launch QuickPWN 2.2.6 downloaded in step 2.
8. QuickPWN 2.2.5 will automatically detect your iPhone, now use browser and select Firmware 2.2.1 downloaded in step 1.
9. Now QuickPWN 2.2.5 will display a green checkmark if the firmware is correct.
10. Using QuickPWN 2.2.5 install Cydia Installer on your iPhone. select at least Cydia from menu, then click the blue arrow to continue.
11. QuickPWN 2.2.5 will prompt “please make sure your device is connected via USB before continuing” click the blue arrow to continue.
12. QuickPwn 2.2.5 will now automatically put your iPhone into recovery mode. Once it is in recovery mode you will be ask to press following key sequence.
- Hold the Home button for 5 seconds,
- Hold the Home and Power buttons for 10 seconds,
- Then release the Power button while continuing holding the Home button until your iPhone is in DFU mode
13. If you followed above steps correctly, QuickPWN 2.2.5 will detect your iPhone in recovery mode and will ask you to “wait while your iPhone is prepared for jailbreaking”.
14 Now wait for QuickPWN 2.2.5 Message “The pwnage process appears to have completed successfully. Please wait for your device to reboot in its newly modified state”.
15. That’s it you have Successfully Jailbreaked your iPhone 3G firmware 2.2.1.


Source: iPhone Download Blog

Ultimate Guide to Unlock iPhone 3G 2.2 (Firmware 2.2) with Yellowsn0w

Any Sim..Anywhere..Use your iPhone 3G..!!

iPhone dev team finally released one of most awaited tool, yellowsn0w. Yellowsn0w is first software unlock tool for iPhone 3G firmware 2.2. The wait for release of Yellowsn0w was quite long one as dev team failed to release on New Year’s Eve but the work done by dev-team is really appreciative.
iPhone Dev team managed to crack latest iPhone 3G baseband 02.28.00 and its surprising that yellowsn0w will now only work with iPhone 3G Firmware 2.2 Baseband 02.28.00 which is contradictory to their prior Message .Their is no news from Dev-Team about making Yellowsn0w to work with Baseband 02.11.07. Many users are facing issue while Unlocking iPhone 3G 2.2 with Yellowsn0w.
Here are answers to all your iPhone 3G Unlocking related questions. We are representing this as a Guide to Unlock iPhone 3G.

Ultimate Guide To Unlock iPhone 3G Firmware 2.2

1. How to Install Yellowsn0w from Cydia
A. Launch Cydia
B. You should see Two Options Packages and Source.
C. Go to Packages -> Edit -> Add & Enter http://apt9.yellowsn0w.com/ URL as a repository URL.
D. Now Go back to Your Cydia Sources menu and you should see the yellowsn0w package!
Screenshots of Yellowsn0w


2. How to Unlock iPhone 3G Firmware 2.2 with Baseband 02.11.07
A. Download latest iPhone 3G Firmware 2.2 from Apple.
B. Use iTunes to Upgrade Your iPhone 3G 2.1 to 2.2.
C. Download QuickPWN 2.2 and Jailbreak your iPhone 3G 2.2 to Install Cydia and Installer.
D. Follow How to Install Yellowsn0w from Cydia Instructions.
E. Run Yellowsn0w
F. Turn off the iPhone and install your third party SIM.
G. Turn on the phone. Wait until your iPhone 3G carrier pops up. If it doesn’t, take the SIM out and reinstall it.


3. How to Unlock iPhone 3G Firmware 2.2 with Baseband 02.28.0
A. You need to have Jailbroken iPhone 3G Firmware 2.2
B. Download QuickPWN 2.2 and Jailbreak your iPhone 3G 2.2 to Install Cydia and Installer.
C. After Jailbreaking iPhone 3G Firmware 2.2 follow Instruction of How to Install Yellowsn0w from Cydia
D. Run Yellowsn0w
E. Turn off the iPhone and install your third party SIM.
F. Turn on the phone. Wait until your iPhone 3G carrier pops up. If it doesn’t, take the SIM out and reinstall it.


4. How to Unlock iPhone 3G Firmware 2.1 with Baseband 02.27
Yellowsn0w won’t work on 2.1 because it has baseband 02.27. DevTeam has restricted it to 02.28 baseband so you must jailbreak and update toiPhone 3G firmware 2.2 in order to use this unlock.


5. How to Upgrade iPhone 3G 2.2 Baseband 02.11.07 to iPhone 3G 2.2 Baseband 02.28.0
Well there is no way which lets you to upgrade only baseband of your 3G iPhone. You need to restore your iPhone 3G Firmware 2.2 to Firmware 2.1 and then again upgrade your iPhone 3G to Firmware 2.2 using iTunes. please keep in mind while upgrading/downgrading iPhone Firmware you will lose all your apps, settings etc.


Important Note:
1. Yellowsn0w is still in beta so use it at your own risk
2. Yellowsn0w is for non commercial use
3. Yellowsn0w many or many not work for you.
We will be updating this guide as an when we get any other information. If you find any issue with this guide then feel free to comment here.


Source: Internet

How to Downgrade iPhone 2.2.1 to iPhone 3G 2.2

Downgrade solutions...!!

Apple has released firmware 2.2.1 for iPhone 3G and iPod Touch 2G. iPhone dev team has clearly warned to all iPhone an iPod touch users that not to upgrade to Firmware 2.2.1 as you may lose your Jailbreak and Unlock ability. We have already posted what is the iPhone and iPod touch 2.2.1 jailbreak and unlock situation is.
It seems not many users took iPhone dev team warning seriously or mistakly upgraded their iPhone and iPod touch to firmware 2.2.1. Now they have lost their jailbreak. So its obvious that question of How to Downgrade iPhone Firmware 2.2.1 to Firmware 2.2 will start surfacing all around iPhone forums.
Fortunately some one at QuickPWN forum has found the way to downgrade iPhone firmware 2.2.1 to iPhone firmware 2.2.
Update: iPhone Dev Team has updated QuickPwn and PwnageTool to jailbreak iPhone and iPod touch with firmware 2.2.1.


How to Downgrade iPhone 2.2.1 to iPhone 2.2 (Firmware 2.2.1 to Firmware 2.2)
1. Downlaod iPhone Firmware 2.2 and save it on your hard drive.
2. Connect your iPhone to your Mac or Windows machine and select your iPhone from the list of devices in iTunes. (read instruction of How to Put iPhone in DFU Mode if itunes doesn’t detect your iPhone)
For Mac Users
3. In the Summary Tab, Hold down Option and press the “Restore” button and select iPhone Firmware 2.2 file (Don’t press just restore button read below note)
For Windows Users
3. If you are using Windows hold down Shift and press the “Restore” button and select iPhone Firmware 2.2 file (Don’t press just restore button read below note)
4. After restoring download QuickPWN2.2 and use it to jailbreak your firmware 2.2. or use yellowsn0w to unlock iPhone 3G 2.2

Note: In step 3 it was an important that not to Just press the “Restore” button as it will result in restoring your iPhone with the latest firmware which is firmware 2.2.1 currently,
By holding down Option in case of Mac or Shift in case of Windows, allows you choose the firmware file that you want to downgrade to.

If iTunes doesn’t detect your iPhone due to any reason then follow below steps
How to Put iPhone in DFU (Device Firmware Upgrade) Mode:
1. Connect your iPhone to your computer.
2. Turn off your iPhone.
3. Hold power and home together for 10 seconds (exactly).
4. Release power but keep holding home until the computers beeps (observed on a PC) as a USB device is recognized.
5. Within few seconds iTunes should detect your iPhone.
Fix DFU Mode Bug on Mac Os X 10.5.6

Please Note: Above guide seems to be working for iPhone 2G but we are unaware of iPhone 3G. We will not be responsible if any there is any damage to your iPhone using above guide. do it at your own risk.


Source: Internet

Friday, February 27, 2009

43 Web Design Mistakes we often commit

There are several lists of web design mistakes around the Internet. Most of them, however, are the “Most common” or “Top 10” mistakes. Every time I crossed one of those lists I would think to myself: “Come on, there must be more than 10 mistakes…”. Then I decided to write down all the web design mistakes that would come into my head; within half an hour I had over thirty of them listed. Afterwards I did some research around the web and the list grew to 43 points.

The next step was to write a short description for each one, and the result is the collection of mistakes that you will find below. Some of the points are common sense, others are quite polemic. Most of them apply to any website though, whether we talk about a business entity or a blog. Enjoy!

1. The user must know what the site is about in seconds: attention is one the most valuable currencies on the Internet. If a visitor can not figure what your site is about in a couple of seconds, he will probably just go somewhere else. Your site must communicate why I should spend my time there, and FAST!

2. Make the content scannable: this is the Internet, not a book, so forget large blocks of text. Probably I will be visiting your site while I work on other stuff so make sure that I can scan through the entire content. Bullet points, headers, subheaders, lists. Anything that will help the reader filter what he is looking for.

3. Do not use fancy fonts that are unreadable: sure there are some fonts that will give a sophisticated look to your website. But are they readable? If your main objective is to deliver a message and get the visitors reading your stuff, then you should make the process comfortable for them.

4. Do not use tiny fonts: the previous point applies here, you want to make sure that readers are comfortable reading your content. My Firefox does have a zooming feature, but if I need to use on your website it will probably be the last time I visit it.

5. Do not open new browser windows: I used to do that on my first websites. The logic was simple, if I open new browser windows for external links the user will never leave my site. WRONG! Let the user control where he wants the links to open. There is a reason why browsers have a huge “Back” button. Do not worry about sending the visitor to another website, he will get back if he wants to (even porn sites are starting to get conscious regarding this point lately…).

6. Do not resize the user’s browser windows: the user should be in control of his browser. If you resize it you will risk to mess things up on his side, and what is worse you might lose your credibility in front of him.

7. Do not require a registration unless it is necessary: lets put this straight, when I browse around the Internet I want to get information, not the other way around. Do not force me to register up and leave my email address and other details unless it is absolutely necessary (i.e. unless what you offer is so good that I will bear with the registration).

8. Never subscribe the visitor for something without his consent: do not automatically subscribe a visitor to newsletters when he registers up on your site. Sending unsolicited emails around is not the best way to make friends.

9. Do not overuse Flash: apart from increasing the load time of your website, excessive usage of Flash might also annoy the visitors. Use it only if you must offer features that are not supported by static pages.

10. Do not play music: on the early years of the Internet web developers always tried to successfully integrate music into websites. Guess what, they failed miserably. Do not use music, period.

11. If you MUST play an audio file let the user start it: some situations might require an audio file. You might need to deliver a speech to the user or your guided tour might have an audio component. That is fine. Just make sure that the user is in control, let him push the “Play” button as opposed to jamming the music on his face right after he enters the website.

12. Do not clutter your website with badges: first of all, badges of networks and communities make a site look very unprofessional. Even if we are talking about awards and recognition badges you should place them on the “About Us” page.

13. Do not use a homepage that just launches the “real” website: the smaller the number of steps required for the user to access your content, the better.

14. Make sure to include contact details: there is nothing worse than a website that has no contact details. This is not bad only for the visitors, but also for yourself. You might lose important feedback along the way.

15. Do not break the “Back” button: this is a very basic principle of usability. Do not break the “Back” button under any circumstance. Opening new browser windows will break it, for instance, and some Javascript links might also break them.

16. Do not use blinking text: unless your visitors are coming straight from 1996, that is.

17. Avoid complex URL structures: a simple, keyword-based URL structure will not only improve your search engine rankings, but it will also make it easier for the reader to identify the content of your pages before visiting them.

18. Use CSS over HTML tables: HTML tables were used to create page layouts. With the advent of CSS, however, there is no reason to stick to them. CSS is faster, more reliable and it offers many more features.

19. Make sure users can search the whole website: there is a reason why search engines revolutionized the Internet. You probably guessed it, because they make it very easy to find the information we are looking for. Do not neglect this on your site.

20. Avoid “drop down” menus: the user should be able to see all the navigation options straight way. Using “drop down” menus might confuse things and hide the information the reader was actually looking for.

21. Use text navigation: text navigation is not only faster but it is also more reliable. Some users, for instance, browse the Internet with images turned off.

22. If you are linking to PDF files disclose it: ever clicked on a link only to see your browser freezing while Acrobat Reader launches to open that (unrequested) PDF file? That is pretty annoying so make sure to explicit links pointing to PDF files so that users can handle them properly.

23. Do not confuse the visitor with many versions: avoid confusing the visitor with too many versions of your website. What bandwidth do I prefer? 56Kbps? 128Kbps? Flash or HTML? Man, just give me the content!

24. Do not blend advertising inside the content: blending advertising like Adsense units inside your content might increase your click-through rate on the short term. Over the long run, however, this will reduce your readership base. An annoyed visitor is a lost visitor.

25. Use a simple navigation structure: sometimes less is more. This rule usually applies to people and choices. Make sure that your website has a single, clear navigation structure. The last thing you want is to confuse the reader regarding where he should go to find the information he is looking for.

26. Avoid “intros”: do not force the user to watch or read something before he can access to the real content. This is plain annoying, and he will stay only if what you have to offer is really unique.

27. Do not use FrontPage: this point extends to other cheap HTML editors. While they appear to make web design easier, the output will be a poorly crafted code, incompatible with different browsers and with several bugs.

28. Make sure your website is cross-browser compatible: not all browsers are created equal, and not all of them interpret CSS and other languages on the same way. Like it or not, you will need to make your website compatible with the most used browsers on the market, else you will lose readers over the long term.

29. Make sure to include anchor text on links: I confess I used to do that mistake until some time ago. It is easier to tell people to “click here”. But this is not efficient. Make sure to include a relevant anchor text on your links. It will ensure that the reader knows where he is going to if he clicks the link, and it will also create SEO benefits for the external site where the link is pointing.

30. Do not cloak links: apart from having a clear anchor text, the user must also be able to see where the link is pointing on the status bar of his browser. If you cloak your links (either because they are affiliate ones or due to other reasons) your site will lose credibility.

31. Make links visible: the visitor should be able to recognize what is clickable and what is not, easily. Make sure that your links have a contrasting color (the standard blue color is the optimal most of the times). Possibly also make them underlined.

32. Do not underline or color normal text: do not underline normal text unless absolutely necessary. Just as users need to recognize links easily, they should not get the idea that something is clickable when in reality it is not.

33. Make clicked links change color: this point is very important for the usability of your website. Clicked links that change color help the user to locate himself more easily around your site, making sure that he will not end up visiting the same pages unintentionally.

34. Do not use animated GIFs: unless you have advertising banners that require animation, avoid animated GIFs. They make a site look unprofessional and detract the attention from the content.

35. Make sure to use the ALT and TITLE attributes for images: apart from having SEO benefits the ALT and TITLE attributes for images will play an important role for blind users.

36. Do not use harsh colors: if the user is getting a headache after visiting your site for 10 consecutive minutes, you probably should pick a better color scheme. Design the color palette around your objectives (i.e. deliver a mood, let the user focus on the content, etc.).

37. Do not use pop ups: this point refers to pop ups of any kind. Even user requested pop ups are a bad idea given the increasing amount of pop blockers out there.

38. Avoid Javascript links: those links execute a small Javascript when the user clicks on them. Stay away from them since they often create problems for the user.

39. Include functional links on your footer: people are used to scrolling down to the footer of a website if they are not finding a specific information. At the very least you want to include a link to the Homepage and possibly a link to the “Contact Us” page.

40. Avoid long pages: guess what, if the user needs to scroll down forever in order to read your content he will probably just skip it altogether. If that is the case with your website make it shorter and improve the navigation structure.

41. No horizontal scrolling: while some vertical scrolling is tolerable, the same can not be said about horizontal scrolling. The most used screen resolution nowadays is 1024 x 768 pixels, so make sure that your website fits inside it.

42. No spelling or grammatical mistakes: this is not a web design mistake, but it is one of the most important factors affecting the overall quality of a website. Make sure that your links and texts do not contain spelling or grammatical mistakes.

43. If you use CAPTCHA make sure the letters are readable: several sites use CAPTCHA filters as a method of reducing spam on comments or on registration forms. There is just one problem with it, most of the times the user needs to call his whole family to decipher the letters.


Source: Internet
Get Chitika Premium
Loading...
Loading...

Get Chitika | Premium